Jan 31, 2010

Results of the Evil Dye Lab Experiment

Well, the fiber addiction has reached a new low.
I could eat this 4 oz. blend of wool and mohair.
Imagine the fur ball I would have to cough up if I did.

Still, part of me thinks it would be worth it.
Is that odd?

I'm not going to eat it. And, (heavy sigh here) I'm not going to spin it either. I've placed it in my little Etsy shop...for now. We'll see how long I can last before I yank it out of there and start spinning.

I think I might need a sponsor ~ someone I can call during moments of weakness. The sad thing about fiberholism is that there is no cure. It's not my fault I'm a fiberholic but, alas, it is my responsibility to control the symptoms.

Jan 29, 2010

Dying Wool in the Evil Laboratory ~ Microwave Dying

This posting will not be a tutorial. There is no method to the madness here. In my last post I demonstrated how to twist a nice length of prepared wool top into a compact and manageable braid without dividing the fibers into three strips. That happy braiding process is the starting point of this most evil experiment.
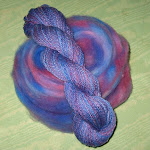
Aren't they lovely? Five  fantastic, 4 oz braids from a commercially combed wool/mohair blend. The mohair adds a touch of luster that is going to really make those acid dyes pop!

First we condition the fibers, make them comfortable. I've prepared a warm soak with just a touch of Synthrapol to encourage our unsuspecting fibers to be receptive to the dye treatment.


(Again, this is an evil experiment. Measurements are made in pinches, dashes and dollops.)

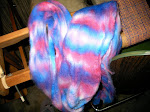
The braided fibers are left to relax and soak in the warm, sudsy water.

Evil ensues, I have plucked one of the braids from the bath. I do not want these fibers to be sopping wet so I  gently squeeze out  much of the soaking solution and arrange the braid on the (slab) operating table.

HOLY COW!  I bet you didn't see that coming. (Heh.) Reminds me of television, when I'm watching a happy, little show about apple orchards or bunnies and suddenly some crazy CSI commercial appears out-of-nowhere with the blood and the guts and the gruesomeness... No warning... No time to shut my eyes or flip the channel...

So, what is in the syringe? I started out with a nice splash of a 1% dye stock solution. I love Sabraset/Lanaset dyes. They are oh so very light and color fast (won't fade) and wonderfully vibrant. To each of my dye cups I add a bit of chemical water: sodium acetate and citric acid crystals. Amounts? (Heh, heh.) Here I must point you to the voice of sanity. This book is a must for the serious fiber artist who loves to dye wool: Color In Spinning by Deb Menz. You will thank me for not handing you the answers. By the way I have nothing to gain by referring you here. This book is a joy and a necessity. The woman dedicated 10 years of her life to perfecting the truly scientific process of dying wool. It is not for me to deny you this experience by tossing out  crazy, irrelevant measurements that are herein only loosely based in reality.

I just have to say, if all the world were addicted to the textile arts then bubble gum trading cards would include super heros of the fiber world and Deb Menz would definitely have her own card. (For my money a Deb Menz card, in mint condition, at a well advertised auction would glean several thousand dollars.)

I have much more to say on this topic of collectible, super hero, fiber artist, trading cards...And not to be dropping names but, I'd want to be sure my personal trading card collection included an Alden Amos, a Mabel Ross, an Elizabeth Zimmermann and a Peter Teal...but I digress. (That's O.K. because I'm in  scary, mad scientist mode.) And, this is what we have after several more injections:

And, here we see the patient has been flipped over in preparation for more treatments.
And, after further injections...

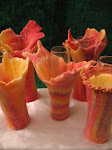
Who's the mad scientist now?

I think this experiment has all the earmarks of a successful operation. But, as the old saying goes, "No brain no pain." Strike that. I mean to say, "No pain no gain." Whichever, it's time to bring on the heat!

After all, acid dyes are heat-set dyes. I'm going to use a microwave. (Yay.) And, although I am a mad scientist I'm not crazy. The microwave I use in all of my evil dye experiments is never, never, I repeat NeVeR used for heating food that one might put in one's mouth and eat. (For that matter none of the tools  pictured will ever be used for food processing. Go to a thrift store and thusly recycle what you need for your own wonderfully evil dye lab.)

Above: Here we see the colorful braid "entombed" in a microwavable roasting tupper. This was an unusually special thrift store find at $2.50. (If there were tight-wad, thrifty-person trading cards I would be my own hero. And, my trading card would be worth several tens of dollars - for insurance purposes only .)

And here's my $5.00, thrift store, 200 lb wool-dying microwave from sometime before the turn of the century (when things were built to last, thank you very much). It has simmer mode. And now we wait?
  
And, now we wait.

How to Braid Wool Roving or Top

For this little demo I am working with Merino Top. I love to purchase wool in this particular preparation. The word "top" refers to a particular type of preparation. To me it means that all the work has already been done. The sheep have been cared for and given their hair cuts for the season. The fleeces have been sorted and skirted. The fibers have been scoured clean and commercially combed out leaving the textile enthusiast with smooth, parallel fibers served up in a long, soft, continuous length of precious, precious wool. Let the party begin!!
I'm going to braid 4 oz. of Merino top (Merino is a particularly wonderful breed of sheep). The round ball of fiber has been gently pulled away from the larger bump. A "bump" is just a term used to describe an extremely huge amount of top that has been wound into a gigantic coil of fiber at the end of a commercial combing process. As you can see my "bump" is dwindling down to a dangerously low level. (Because I am fiber-addicted this situation is cause for intense anxiety and must be rectified pronto! But, for now let us forge ahead.)

See what I've done above? The 4 oz. of fiber that has been laid out in a very long 'N' shape. The body of the 'N' gives you the three strands needed to create your braid without breaking the top into 3 pieces. (We want to keep the entire 4 oz. of  wool as one continuous length of top.)

We'll start the braid of the top at the top of the 'N' (shown above).

...tuck in the end and start braiding.

Braid and braid and braid. You'll find you have to untangle the thing as you go. The end piece at the bottom can be easily pulled out of the entanglement. Once you've reached the bottom of the braid simply tuck the loose end into the last of your twists.
VOILA!
You have a nice, orderly, continuous 4 oz. length of combed top!

Now, let us have a word on this whole braiding matter: I am very much a function over form type of gal, "Heck, 'em braids surely do look mighty purty" and all that but, if it doesn't serve a purpose beyond astetic appeal I'm really not interested in braiding fibers.

So, why do it? Well, you can condense a large amount of pre-measured fiber this way. A nice, compact braid stores easily and well. Also, when providing supply for other textile enthusiasts pre weighed portions of braided top travel very well! The braiding serves to protect your combed preparation from being disturbed in transit. (What good is combed top if it is all jumbly?) A person can also easily offer and display a large variety of choice in a small space.

On a more evil note, my most favorite reason for braiding combed top is because a person can really have a crazy-good time dying the unsuspecting braid.

See all the lovely separate areas that a braid naturally creates for multi-colored dying? Wouldn't it be just the most meniacal fun to inject dye stock solutions willy-nilly into those little puffs? Oh how it thrills me to know that, at this very moment, I have 4 individual braids of a lustrous wool and mohair blend awaiting me in the dye laboratory. Heh, heh, heh. More will be revealed.

Jan 15, 2010

More Wet Felting

Here are a few photos from a small wet felting project where the wool was felted around a plastic jar. This little piece was completed the same way as the tiny felted bags I've been making by wet felting wool around golf balls.

First picture above: I prepped 5 different colors of wool using my small, Louet drum carder. I carded the colors side-by-side as I did not want them to all blend together.


Above: This is a picture of the pre-drafted fibers. Keeping the colors separate I gently thinned the batt by pulling the fibers into a long, wispy roving. I did this very carefully to keep an even distribution of color.  Now I have nice thin layers of multi-color wool for wet felting. This is about 1/2 oz of total fiber. I'll reserve a portion of this roving for spinning a matching yarn to finish the vessel.

The above picture is all that is needed for wet felting other than water and your own two hands. Here you see the wool blend, diluted Dawn dish liquid, and a small plastic lotion container that will be used to support the wool as it is felted.


Above: The first layers of wool gently layed over the plastic container. (I did not take pictures of the subsequent layers but two more were applied until the jar was completely enclosed in wet, colorful wool.) I criss-crossed the fiber layers and then gently rubbed the wet, sudsy wool until it all began to felt together. It is initially important to be very careful to not displace the fibers. You will be rubbing over them. Eventually all the individual fibers will slowly felt together into a solid wool fabric. (Scroll down to my previous post for a better explaination and how to incorporate the use of hot and cold water to speed the process.)


The above picture shows the finished felted portion. I cut a hole in the top of my felted fabric to remove the lotion jar then continued wet felting until the vessel became strong, thick and smaller than the jar. The leftover roving was used to spin and ply a thin yarn for crocheting around the top of my vessel.


And above is the finished piece. The small background picture is of this same project beside a smaller vessel that was made by wet felting over a golf ball. I like the effect of using a variety of colors when felting this way.

I prefer to felt smaller projects but extremely large vessels can be created using this same process.

Jan 10, 2010

Tutorial: Wet Felting a Woolen Vessel


Ingredients needed:

  • Watered-down Dawn dish washing liquid. There's no special ratio. Add just enough water to make the liquid thin and runny yet still able to suds up.


  • Access to hot and cold tap water. Wool felts more quickly when it is subjected to sudden temperature changes.


  • Wool. The amount you need will be based on the size of the vessel you desire.  I photographed an assortment (far more than I need for this project). The bagged fibers are odds and ends of left over wool.  You can also purchase roving like that braided in the picture. (Shown right: When the braid is undone it is actually one continuous fiber preparation.)


  • A smooth, water-proof object to form your fibers around. I will be using a small golf ball. In my top picture, left of the golf ball is a lotion jar that would also serve nicely as a form for a small vessel. You can also use a great variety of other objects: empty coffee cans with  secured lids (tape the lids down well), basket balls, beach balls etc. Anything that is smooth and will keep its shape when wet.


In this tutorial I am making a very small vessel using a golf ball as the form. It is a good idea to start with a small project as you get a sense of the process. The first step is to lightly wet down the shape you've chosen. Then gently add a thin layer of fiber. Remember whatever colors you choose for the first layer will be the colors of the INSIDE of your vessel. This may be important when felting a large, open vessel.

Continue to add thin layers of fiber all around the shape you've chosen. Take care to have an even amount of wool over the entire shape. Take care as well not to move the fibers around. At this point the goal is to gently adhere 3 even layers of fiber completely over the shape using the diluted dish liquid. It is a good idea to criss cross the layers alternately. Example: The first layer may be adhered vertically and the second layer or wrap of wool is horizontally applied.

Because I am using a golf ball it is easy to gently begin to introduce friction as a felting method. Very gently roll the wool-covered golf ball around in your hands as you would roll a ball of cookie dough only apply little to no pressure. Take care not to displace the wool. The sudsy liquid will aid in this process.
You will notice that the fibers begin to settle into one another and adhere more firmly to the ball. They will actually begin to tighten around the shape. At this point you can apply friction with more pressure. When you are confident that the fibers won't be disturbed you can apply friction while alternately running the project under hot then cold tap water. The hot water opens up the fibers relaxing them. Alternating to cold water shocks the fibers causing them to intertwine and felt together. Continue to apply friction while rolling the ball under the hot then cold water.

When felting larger objects you will need to apply gentle friction to small areas at a time but the process is the same.


Once the fibers feel to be reasonably felted you are safe to cut a small hole in the wool. This will be the vessel openning or top so place the cut accordingly. This openning will stretch greatly when you work to remove the shape inside. It is a good idea to make as small an openning as possible. You can always enlarge it if necessary.

Above you can see just how large that little openning became. It was a good bit of work getting the golf ball out of the vessel but, I'm quite glad I cut only a tiny hole. Please note that at this point the vessel is larger than the shape used to form it. We are not done felting. This vessel will become smaller than the golf ball. When choosing shapes for other wet felting projects remember to work with something that is larger than what you want the finished piece to be.

Now that the shape has been removed you will further felt the fibers. You can be rather rough with the wool at this point. Continue to liberally apply the diluted dish liquid as you apply friction to the vessel rolling and rubbing it in your hands. When working with a very large project I like to use a washboard and vigorously scrub the wool to expedite the felting process. Remember, with a larger object you will be working  the fiber into the shape you desire. If you felt one area more than another the project will become tighter and thicker in the worked section. You can use this to your advantage in making interesting forms. If you are wishing to have an evenly felted vessel take care to apply the same friction to all areas of the project evenly.

Continue as well to utilize temperature change to shock the wool. Alternating hot and cold water while incorporating diluted dish liquid will expedite the felting process.

Above: After further felting the vessel is now smaller than the form over which it was shaped. Again, always form your vessel around a shape that is larger than you desire your finished project to be.


Above: I'm giving this fuzzy vessel a little trim. Wet felting can be done with most any animal fibers. The wool blend I chose had a little mohair in it and created a bit of a fuzzy halo. While I like a furry effect in some wet felted projects this vessel had a nice color play that I wanted to show off. Using sharp scissors to nip off the fuzz is one way of finishing a piece. If a furry effect is desired one can brush up the fibers and intensify the halo. It is a matter of preference, whatever you desire.

Embellishments ~ There are as many ways to decorate a finished vessel as there are creative ideas to be had. If you enjoy embroidery, knitting, crochet, needle felting, jewelry making, wire work, etc. you can incorporate your favorite craft interests into the vessel.

For this little project I spun a fine thread that picked up the colors of the felted fibers. Using a small, sharp crochet hook (I chose size 6) I puctured holes along the top opening of the piece and crocheted into them and around. Don't be hindered by a desire for a specific pattern to follow. Just have fun doodling with your chosen craft activity. You can even wet felt multiple pieces and sew them together! It's all fun.
Below is the finished vessel. I really like the color play in this one:


Below are a few more little wet felted creations made using a golf ball as the forming shape and embellished with a simple crochet hook and thread. They'd make great little containers for small jewelry gifts, tooth fairy pouches, even as adornments to a necklace.

I hope this tutorial was helpful in providing an overview of the basics of wet felting. If you are new to the process I heartily recommend you start small and simply to let yourself get a feel for the various stages of felting and the overall process. (Warning: If you enjoy wet felting then you'll LOVE dry needle felting which is a process of sculpting dry fibers with a sharp, barbed needle. It is very different from wet felting and a great way to create unique doll and animal characters.)

Jan 7, 2010

COCOA COZY!


I think this row-by-row, decide-as-you-go knitted cozy looks a tiny bit like either a broccoli or an asperagus spear. Anyway, it's intended to give off a gardeny vibe.

The top is crocheted from some of the coily novelty yarn I've been unable to stop spinning. Turns out it is not only great fun to make crazy yarn but quite intriguing to play with in projects as well! (Sadly, this realization only exacerbates the overall addiction experience.)

The bulk of my "cozy giftie" for sister Laura was spun using a little, inexpensive, wooden drop spindle which puts me right back on top of my soap box: If you are not yet spinning you really must look into this handy little tool and see how much fun there is to be had twisting up your own unique yarns! Take a walk on the wild side. Delve deeper into the fiber frenzy. I assure you it's harmless.

So, here's the bottom of the cozy:

Just flip it over and voila! Easy access to whatever you deem to be the cozied contents inside!
It could be a candy corn cozy...
or a cashew cozy...

When one lives in Northern Wisconsin and it's -10 deg. F. outside for more than just a few days in a row  it's a comfort to knit anything that has the word "cozy" in it.


Jan 5, 2010

Surprise Giftie For Sister Laura

My sister Laura always calls presents "gifties". She's due for one from me because her birthday fast encroacheth. Laura is a fabulous painter. She does beautiful things with blue and yellow. She is also the Garden Goddess. (I used to be crazy for gardening myself before I became a total textile addict and no longer had the time for anything non-fiber related.)  She shops locally and she feeds her family seasonally. She loves chocolate.


So, guess what I made her! (Hint: Wool is the single largest component involved.)

Jan 3, 2010

A New Decade ~ Time For Me to Slow Down

Claxton and I were talking about how time seems to click by at a much faster pace than it used to. Here we are at the beginning of another new decade. We just know it is going to fly past at break-neck speeds.

When I was young a few months of Summer vacation seemed to stretch out endlessly. But, that only makes sense. A 10 year old of today will have quite a decade ahead. By the time 2020 rolls around that child will have had a great many first experiences traveling from the 5th grade all the way up through high school and on into college. Everything about that individual will have changed dramatically from how it was at the start of 2010.  Most of the childhood memories this person will hold for the rest of time will have occurred in that 10 year stretch. Yep, a 10 year old today will pack in a lot of living over this decade ahead.

While I hope to have many new experiences myself they aren't likely to be as exciting as the great "firsts" I've already enjoyed, which is fine with me. Right now it would feel good to simply enjoy the moment I'm in, slow down and savor all that I've come to take for granted. Maybe that would be a good New Year's resolution for me. Might as well start with my terrible fiber addiction love of the textile arts.

Last night I decided it was time to start working on a little hand knit gift for my sister, Laura whose birthday is in a few weeks. She loves blue, yellow and green so, I decided to combine these colors for the yarn. Below are the 1.5 oz of wool for the project yarn:

Now, it doesn't take a person very long to spin up 1.5 oz of fiber. Just sit down to the spinning wheel, get that fiber spun and move on to the knitting. But, spinning wool is a real pleasure when it is not viewed as a task or job to complete. It is also a practice that is available to anybody, rich or poor, living in a big house or a tiny apartment or even out of a travel bag. That's because a person doesn't need a big, expensive spinning wheel to make yarn. (Although, I need all of my wheels, I just don't need them to make yarn.) A simple spindle is a wonderful and perfectly adequate tool for creating your own special yarn blends. It just takes a little longer so I tend not to choose to use a spindle.

But, I love spindling. I just feel a strange guilt believing precious fiber time is being wasted. After all, I can spin faster on a wheel. When did I start believing that getting more done faster is always better? That's nonsense.

So out came the spindle and 20 minutes of spinning turned into...a little longer. Below is the spindle with 1.5 oz on board:


And, here's the final navajo 3-ply ready to knit:


The spindle is such a simple tool. Its light, inexpensive and easy to store and take anywhere. This year I resolve to use the spindle more often and simply enjoy this aspect of projects pursued in 2010...and beyond. A toast to savoring the decade ahead!